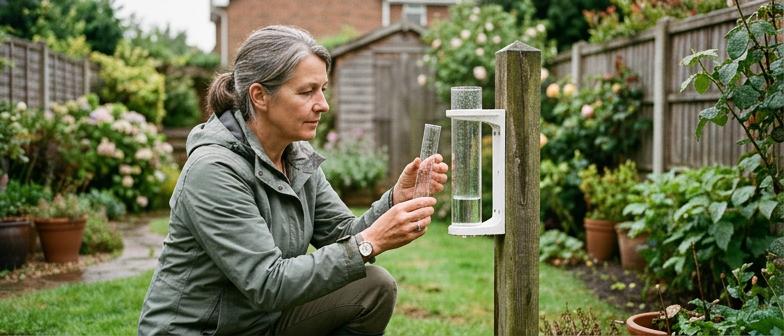
Why Backyard Rain Gauge Science Matters
Setting up a simple rain gauge outdoors turns everyday weather into a small, ongoing science project. Backyard rain gauge science gives you a direct way to see how much precipitation reaches the ground where you live, instead of relying only on regional forecasts. By turning rainfall into numbers you can write down, it becomes easier to notice which storms are light or heavy, how often showers arrive, and how local features like trees or buildings might affect what falls in your space. This kind of hands-on observation fits naturally into home climate learning, because it connects abstract ideas about weather systems and the water cycle to real droplets collected just outside your door.
When you record each rainfall in a simple log, you create your own record of local weather patterns over time. Even a beginner science experiment such as measuring rain after every storm can reveal seasonal trends, drier weeks, or unusually wet periods that you might otherwise forget. Regular outdoor data recording encourages careful measurement, consistent timing, and clear note-taking, which are useful habits in many areas of science. As you compare one month or year with another, the numbers in your notebook become a basic form of weather pattern tracking, helping you see how conditions change where you live without needing complex instruments or advanced training.
Choosing and Setting Up a Simple Rain Gauge
For backyard rain gauge science, you can use a basic store-bought gauge or a clear, straight-sided container with a flat bottom and scale. For simple weather measurement, the key feature is a narrow, uniform cylinder so the water depth reflects rainfall accurately. Avoid decorative shapes, wide bowls, or tapered containers, which distort readings. If you make your own, mark a clear scale in millimetres or inches and be sure the container is sturdy enough to stay upright during storms. A simple, reliable design makes outdoor data recording easier and more consistent.
Choose a spot in your yard or garden that is as open to the sky as possible. Keep the gauge away from buildings, trees, fences, and walls so they do not block rain or funnel extra water into it. As a guide, place it at least twice as far from any obstruction as that object is tall. Mount the gauge on a stable post or level surface, with the container standing vertical and the rim horizontal. With careful placement, your small setup becomes a dependable part of home climate learning.
Fix the gauge so it cannot tip and set the zero mark exactly at the bottom, removing any standing water before each storm. Make sure splashes from roofs, patios, or hard surfaces cannot reach the opening, and that soil or leaves are unlikely to blow inside. Read the gauge at the same time each day and empty it after recording, so your precipitation log stays clear and comparable. This simple routine turns backyard rain gauge science into a beginner science experiment in tracking local weather patterns.
| Checklist Item | What to Confirm Outdoors | If Not Met |
|---|---|---|
| Gauge shape | Straight-sided, narrow cylinder | Readings likely distorted |
| Scale markings | Clear inches or millimetres at true zero | Difficult to compare storms |
| Mounting stability | Firmly fixed, cannot tip in wind | Risk of spill or lost data |
| Gauge level | Container vertical, rim horizontal | Depth readings less reliable |
| Site exposure | Open sky, far from trees and buildings | Rainfall may be blocked or funnelled |
| Splash and debris control | Away from roofs, hard surfaces, loose leaves | Extra water or blockage in gauge |
Best Placement Practices for Accurate Readings
For simple weather measurement in your backyard, place the rain gauge in an open area where drops are not blocked or funneled by roofs, trees, or fences. Set it on level ground, with the rim at comfortable reach so you can read and empty it without bumping it. Keep it away from sprinklers, downspouts, hard surfaces that cause splashing, and spots where soil or leaves might blow in and block the funnel.
Good placement supports reliable outdoor data recording and helps you track weather patterns over weeks and seasons. Keep the gauge at least twice as far from a tall object as the object’s height to reduce wind effects. Mount it vertically and check after storms that it has not tilted. Using the same carefully chosen spot turns your daily notes into a consistent record of local rainfall.
How to Read Your Gauge and Record Rainfall
Once your backyard rain gauge is in place, the first step in simple weather measurement is learning exactly where and how to read the scale. Check the gauge at about the same time each day and approach it gently so you do not shake the post or splash water up the sides. Keep the tube at eye level and look straight across the surface of the water to avoid parallax errors. Read the number at the bottom of the curved water surface, called the meniscus, and confirm whether the markings are in millimeters or inches so your readings stay consistent. If the gauge has an inner measuring tube and an overflow area, pour the inner tube into a marked container, add any extra water from the outer cylinder, then take your final reading.
To turn what you see into a useful precipitation observation log, write your reading down immediately in a notebook, spreadsheet, or weather app. Record the date, observation time, amount of rain, and short notes about conditions, such as a quick thunderstorm or a steady drizzle. Keeping this outdoor data recording in a clear, repeated format makes it easier to spot patterns later. Many families treat this as a beginner science experiment, letting kids read the number while an adult double-checks and writes it down. When the entry is complete, gently empty the gauge, clear out any debris, and reset it to zero for the next rain event.
As entries accumulate, you can compare weeks or months and see simple weather pattern tracking appear from your backyard totals. Look for stretches of dry days, sudden wet periods, or seasons when storms cluster, and connect these to changes in your garden or nearby streams. To avoid common beginner mistakes, never combine several days of water before reading, since that hides when the rain actually fell. Also watch for tilted posts, clogged funnels, or water splashed in from a hose, which can distort your measurements. By reading the gauge carefully and recording each event right away, your home climate learning project can give you a clear, reliable picture of local rainfall.
Keeping a Reliable Precipitation Observation Log
A simple precipitation observation log turns your rain gauge into a small outdoor data recording station and makes backyard rain gauge science more meaningful. Use a notebook or spreadsheet and give each entry its own line. Record the date, time of reading, rainfall amount, and whether you emptied the gauge. Add brief notes about the weather, such as steady rain, brief shower, or overnight storm, to support home climate learning and remind you what conditions produced the numbers.
Consistency matters more than detail, so try to read your gauge at the same time each day and record even zero rainfall days. This habit shows dry spells as clearly as rainy stretches and reveals patterns over weeks and months. As your log grows, you can compare seasons, notice unusual weeks, and connect your numbers with local forecasts to see how your backyard conditions change.
Exploring Weather Patterns With Your Backyard Data
Once your backyard rain gauge has been running for a few weeks, the numbers in your notebook start to reveal more than single storms. With simple outdoor data recording, you can notice which days tend to be wet or dry, how long dry spells last, and whether rain usually arrives in short bursts or steady showers. This is Backyard Rain Gauge Science in action: each small measurement adds to a basic record of how water moves through the air above your home.
As your precipitation observation log grows month by month, it becomes a tool for weather pattern tracking. You may see that some months bring heavier totals while others stay mostly dry, or that several modest storms can add up to the same amount as one intense downpour. Comparing totals from different weeks and seasons is a form of home climate learning, helping you sense how typical this year feels, even without professional instruments.
Over longer periods, this beginner science experiment in simple weather measurement can highlight how variable local conditions really are. A few seasons of backyard data may show that the timing and intensity of rainfall shift from year to year, reminding you that climate is built from many small weather events. Watching how your records line up with news forecasts or regional summaries strengthens your understanding of local climate variation and turns a basic project into an ongoing habit of observing change over time.
Q&A
-
What is backyard rain gauge science and why does it matter?
It is the practice of measuring rainfall at home with a simple gauge so you can see how much precipitation actually reaches your yard, not just what a regional forecast reports. -
What kind of rain gauge is best for simple weather measurement at home?
Choose a clear, straight‑sided cylinder with a flat bottom and marked scale; avoid wide or decorative shapes that distort the depth of collected water. -
How should I place my gauge for accurate outdoor data recording?
Put it on level ground in an open area, away from roofs, trees, fences, sprinklers, and hard surfaces that can block, funnel, or splash extra water into the gauge. -
What should I include in a basic precipitation observation log?
Log the date, reading time, rainfall amount, whether you emptied the gauge, and a short note on conditions, such as steady rain or brief shower. -
How can this home climate learning project help me track weather patterns?
Over weeks or months, your records reveal wet and dry stretches, typical storm intensity, and simple patterns in how rain arrives where you live.